One of the biggest struggles I had in my lessons with Sandy Yamamoto last semester was playing with a straight bow.
It is a frustrating issue as a violinist because it is so complex. Our line of sight makes perceiving ‘straightness’ difficult. The bow is naturally curved and our strings are sloped. Furthermore, our joints (elbow, wrist, knuckles) move in arcs, not in straight lines.
It is a wonder that even the pros can play with a straight bow. But they do (see?).
Whether you are Hillary Hahn performing Bach or a beginner learning Happy Farmer, you memorize the shape of the bow arm, the placement of the elbow, and the angle of the bow to the string to get by. But, without critical and productive feedback, it is all too easy to memorize the wrong version of “straight.”
Below you’ll find three ways to address crooked bows in your studio.
1. DIRECT AWARENESS.
The power of the gaze is incredibly useful in remedial teaching. The problem is that most violinists (myself included) compulsively look at the left hand exclusively.
Students are rarely visually aware of the contact of bow to string, but it is that awareness that can be your biggest tool in correcting a crooked bow.
First, prove to students that they can play without looking at anything. In the lesson lead students through some of the following activities…
- Bow games (up like a rocket, for example) with eyes closed
- Review pieces in the dark
- Finger combinations or shapes behind their back
Next, do review sessions where the only goal is to focus eyes on bow contact. Be explicit. It is not the tip, the frog, or even the stick that you are concerned with them watching. You want them to look at the spot at which the bow hairs touch the string.
It can be challenging to look at that spot for an extended time without training, so give the eyes a job. Ask your student to report back a measurement of how far the bow contact was from the bridge. How many inches?
Students will still be tempted to look at their fingers, which should be expected (just consider how many hours they’ve spent training their eyes to watch their left hand!). To help, try using a sheet of paper or your hand to block the line of sight from eyes to finger while still leaving some space for the strings to vibrate. Students will be stuck with the option of looking at their bow contact point or your paper/hand — which you can place close to the edge of the fingerboard. If you see their eyes are drilling a hole into your paper/hand, go ahead and direct their attention back to the bow by pointing.
The ability to direct attention to the bow will already begin to solve problems. Students rarely play with a bow over the fingerboard or on the bridge when they are actively watching the contact point, but read on to refine their bow strokes.
2. CHOREOGRAPH THE ARM.
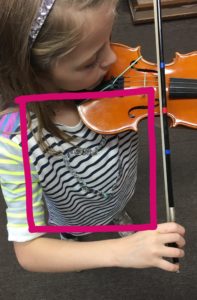
We start our students in the middle of the bow where the arm, bow, and violin make the shape of a square. As they learn rhythms, they learn to open of the elbow to go higher than than the middle. However, I don’t teach my students to go far from the middle in the beginning because there is complexity in maintaining a perfect bow hold near the frog and tip.
As we move on in repertoire the mid-upper half of the bow will not be sufficient, so I establish a way to get from frog to tip without distorting the bow hold or changing the angle of the bow to string. These ideas have been adapted from the training I did with Dr. Sue Baer.
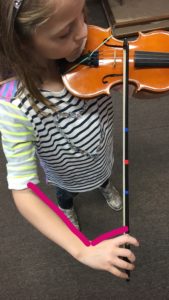
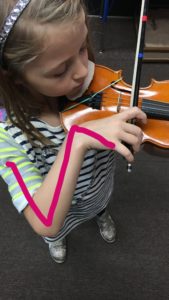
You start by establishing shapes of the bow arm at different locations in the bow. In the middle, as we’ve already discussed, the arm should be in a square shape. At the tip, in order for the bow hand to stay the same the arm will make a V shape. And at the frog, the arm will make a Z shape.


Practice this with students by training them to fly the bow from one shape to the next without making any sound. Require the move between the shapes as efficiently as possible as possible and look vigilantly for any signs of tension.
Once this is mastered, describe and practice the mechanism for moving from one shape to the next on the string. From middle to tip, students will move “out” and “in” by leaving their upper arm in the same place and bending the wrist. Practice this many times so that the elbow and wrist are synchronized in moving the bow straight out to the tip.
Next, start training the middle to frog motion. Students will “float” and “sink” the entire arm in order to travel to and from the frog with a perfect bow hold. As the bow approaches the frog, the upper arm will float up and the wrist will bend toward the nose until the Z shape is made. To go back to the middle, students drop the elbow down and straighten the wrist back to a neural position. Practice the “float” “sink” mechanism many times until mastered.
Finally, combine the two mechanisms (“out-in” and “float-sink”) to play with a perfect bow hold and straight bow the entire length of the bow. See it in action in Josie’s performance below.
A student at any age can use this choreography to understand all of the complex components of playing with a straight bow. If a student only goes crooked at the very tip or the very frog, you can isolate that motion by discussing separately “out, in” or “float, sink.” Using this method you can diagnose small issues without jeopardizing larger motions that are already working well.
It is by cognitively understanding and naming the multitude of arm motions required to play straight that you can make some real progress. However, if crookedness still persists use the next technique to train a kinesthetic understanding of straightness.
3. EXAGGERATE THE CORRECTION.
This method is remedial and works best to correct a crooked bow quickly.
Ask students to play the piece on which they are working on top the bridge— completely sul ponticello. Require that all other aspects of playing stay the same (vibrato, articulation, bow speed, bow distribution) except for contact point. They will get a very scratchy, harsh sound, but you are drawing their attention to the connection of the bow to the string.
Often what happens when you ask students to play closer to the bridge or with a straight bow is other aspects of playing fall apart. This is because it is indeed harder to play straight and closer to the bridge than crooked and close to the fingerboard. Playing with integrity requires more muscles operating in a more nuanced way. But you want to flip this perception of difficulty.
Make playing straight with a good contact point sound better and feel easier by pulling the bow all the way over the bridge. It is an extreme challenge that shocks students. Once you allow them to move back to ‘normal’ (the proper contact and angle), they will be relieved. Not only will it sound easy, but it will feel easy.
These techniques work for any students at any age. Good luck using them in your studio to keep your bows nice and straight.
